MicroFrontends with Vue

Microservices are a well known concept nowadays. Handling encapsulated logic in different applications, can be a nice fit for bigger teams to avoid problems in deployments and development speed. Most of the time though, people are talking about the backend, where the UI part to some extend stays as a black box. One of the solutions to also further break down the UI is the concept of microfrontends which we will further explore here.

There are obviously also other ways to solve issues (I can highly recommend reading Sam Newmans awesome book on this https://samnewman.io/books/building_microservices_2nd_edition/ ), but one way to decompose your UI might be as following.

Each service not only contains the backend logic which then gets called the from one service to render the UI, but rather each service comes with its own UI which then gets loaded into an application which keeps an overview of all the systems to load. This allows us to deploy the full service UI and backend on its own without the need to deploy one big system for each change. This avoids keeping two systems too much in sync in terms of deployments.
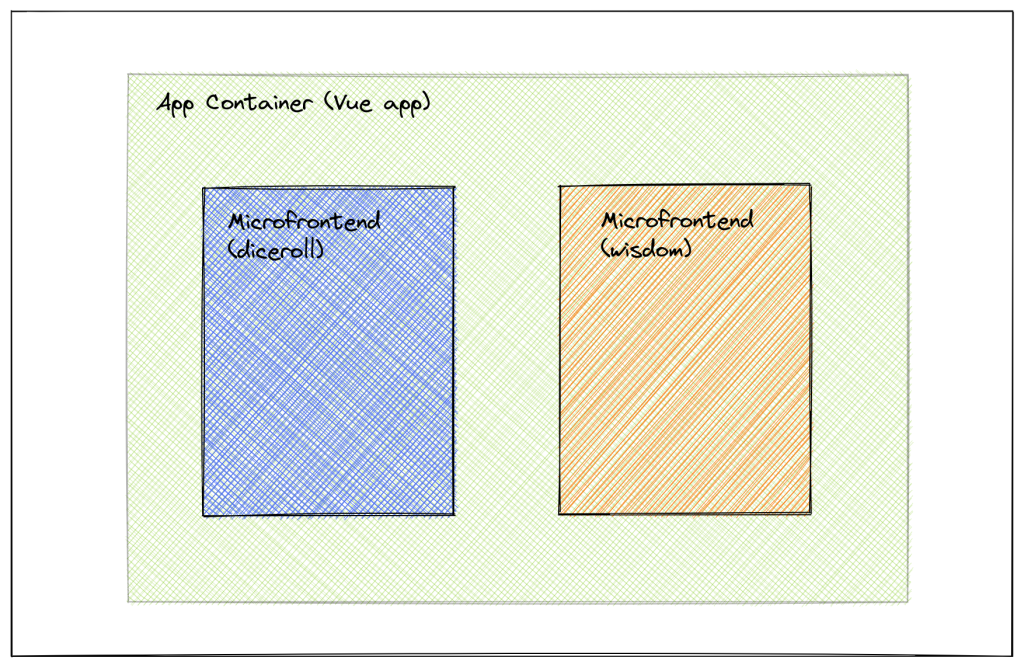
Basic structure

In order to do this I used a vue js setup, where we have one container app, which further loads asynchronously applications into the main container (this is heavily inspired by https://blog.bitsrc.io/how-to-develop-microfrontends-using-react-step-by-step-guide-47ebb479cacd
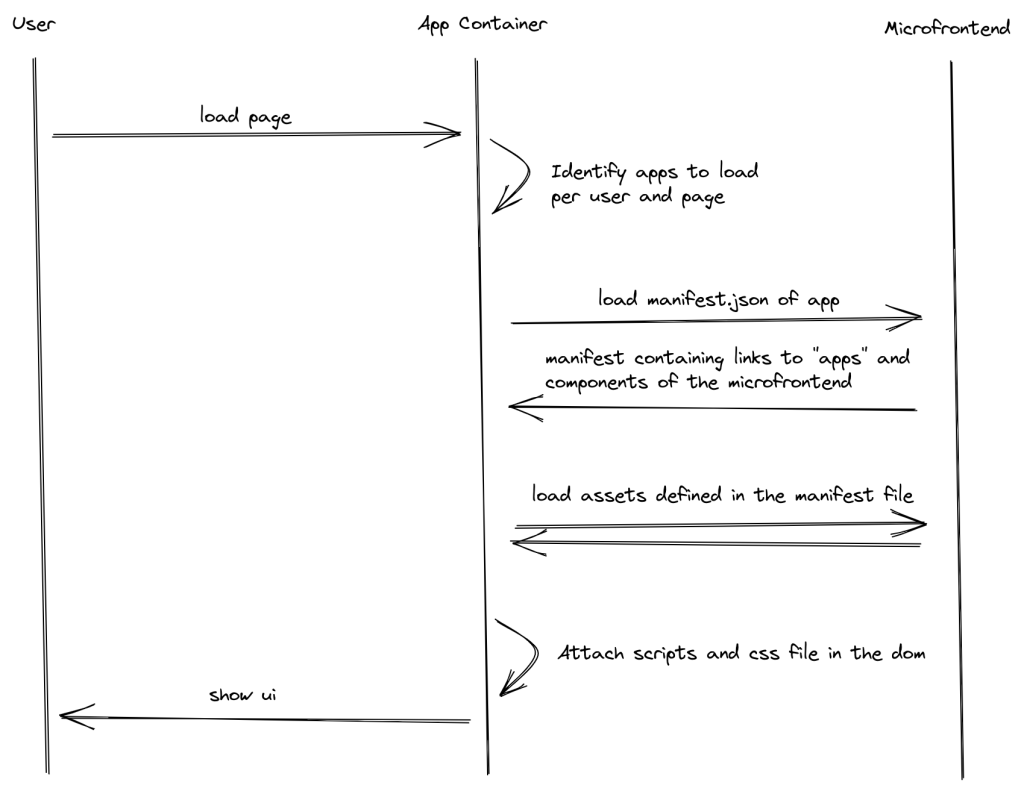
flow of data

To achieve this one component was written:

<template>
  <div :id="this.containerName()" />
</template>

<script>
//utility function to generate a uuid (I didn't wanted to import the uuid
//lib just for a random string
function uuidv4() {
  return ([1e7]+-1e3+-4e3+-8e3+-1e11).replace(/[018]/g, c =>
      (c ^ crypto.getRandomValues(new Uint8Array(1))[0] & 15 >> c / 4).toString(16)
  );
}
export default {
  name: "MicroFrontend",
  props: {
    // name of the microfrontend like `wisdom` or `dicreoll`
    name: {
      type: String,
      required: true
    },
    // host where the script should be loaded from
    host: {
      type: String,
      required: true
    },
    // define a static container name rather than a generic one
    // not needed if you are ok with random divs all the time
    staticContainerName: {
      type: String,
      required: false,
      default: null
    }
  },
  data: function () {
    return {
      uuid: uuidv4()
    }
  },
  methods: {
    // calculates the container id we load the microfrontend app into
    containerName() {
      if(this.staticContainerName != null) {
        return this.staticContainerName;
      }
      return `${ this.name }-${this.uuid}-container`;
    }
  },
  mounted() {//
    // id is generated by frontend - this will avoid loading the same
    // script twice
    const scriptId = `micro-frontend-script-${this.name}`;
    const renderMicroFrontend = () => {
      const fnName = `render${this.name}`;
      const containerName = `#${this.containerName()}`;
      //load the render function per convention and handover the container id
      window[fnName](containerName);
    };
    if (document.getElementById(scriptId)) {
      renderMicroFrontend();
      return;
    }
    //first load the manifest.json this contains the way forward
    fetch(`${this.host}/manifest.json`)
        .then((res) => res.json())
        .then((manifest) => {
          const script = document.createElement("script");
          script.id = scriptId;
          
          script.crossOrigin = "";
          //load out the path to the main.js file
          script.src = `${this.host}/${manifest["src/main.js"]["file"]}`;
          script.onload = () => {
            // call the function defined on top which will resolve then the app
            renderMicroFrontend();
          };
          document.head.appendChild(script);
        });
  }
};
</script>

<style scoped>
</style>

At the mounted stage we will trigger a check and if necessary a load of the corresponding script files.

Each script is ensured to be loaded only once, where the script id is the identifier here. Each microfrontend must follow a convention here and offer in its own application a function called render<name> (e.g. renderDiceRoll ). The manifest json must per convention offer a file with src/main.js which consists of the render functions. The script is than attached to the document header section so that it can be loaded. Afterwards the function is called, which calls the actual render function of the microfrontend app.

Calling one microfrontend is than as simple as including this in the main container.

<vue-micro-frontend name="diceroll" host="http://localhost:8000"/>

The full sample can be found here https://github.com/zelle7/vue3_microfrontend_poc

Not solved here

Things which are left out here:

  • Authentication
  • Communication between services
  • Different technologies (like loading vue3 and vue2 or even things like react)

Links

Twitters Typeahead and Ajax

Twitters JQuery-Autocompleter Typeahead (nicht Bootstrap Typeahead, welcher in Bootstrap 3 auch nicht mehr integriert ist) ist ein recht praktikabler Autocompleter den man mit ein paar Zeilen gut an seine eigenen Bedürfnisse anpassen kann. Ich zeige es hier Anhand eines Ajax Calls mit zuerst noch nicht passenden Daten für Typeahead. Um diesen jetzt mit Custom Ajax Daten zu befüllen, werden der typeahead Funktion folgende Optionen übergeben.

Remote sagt hier aus das die Daten nachgeladen werden (könnte z.B. auch eine Json Datei auf einen Server sein oder ähnliches). Remote wiederum besteht aus mehreren Parametern die befüllt werden können. Die Url gibt logischerweise nur das Ziel des Ajax Calls an. Wie man bei URL sieht stelle ich mir hier z.B. die url durch eine Variable und den Wert des Inputfelds zusammen %QUERY wird anschließend von der Funktion automatisch mit dem Wert des Inputfeldes ersetzt. Um jetzt die noch nicht ganz passenden Daten in passende Daten zu konvertieren gibt es hier auch noch das filter – Feld. Diese erwartet eine Funktion, wobei der erste Parameter die vom Server geholten Daten repräsentieren. Hier erstelle ich ganz ein ganz simples Array, welches ich anschließend zurückgebe (Twitter Doku)


        $('#input').typeahead({
            remote: {
                url: baseUrl+'?q=%QUERY',
                filter: function(parsedResponse){
                    var data = [];
                    $.each(parsedResponse, function(index, item){
                        data.push(  {
                            value: item.name,
                            tokens: [item.name],
                            name: item.name
                        });
                    });
                    return data;
                }//A function with the signature filter(parsedResponse) that transforms the response body into an array of datums. Expected to return an array of datums.
            }
        });

So hat man mit ein paar Zeilen Daten vom Server abgeholt und an seine Bedürfnisse angepasst. Für Bootstrap 3 müssen momentan noch ein paar Zeilen CSS eingefügt werden (Typeahead CSS ). Zusätzlich musste ich aber hierbei noch für die hints display: none setzen da der Hint nicht an die passende Stelle wollte. Zusätzlich musste ich für den Span die Breite auf 100% erhöhen da sonst das input Feld zu klein bleibt.


.twitter-typeahead .tt-hint
{
    display: none;
    height: 34px;
    padding: 6px 12px;
    font-size: 14px;
    line-height: 1.428571429;
    border: 1px solid transparent;
    border-radius:4px;
}

.twitter-typeahead .hint-small
{
    height: 30px;
    padding: 5px 10px;
    font-size: 12px;
    border-radius: 3px;
    line-height: 1.5;
}

.twitter-typeahead .hint-large
{
    height: 45px;
    padding: 10px 16px;
    font-size: 18px;
    border-radius: 6px;
    line-height: 1.33;
}

.twitter-typeahead .tt-query,
.twitter-typeahead .tt-hint {
    margin-bottom: 2px;
}

.tt-dropdown-menu {
    min-width: 240px;
    margin-top: 2px;
    padding: 5px 0;
    background-color: #fff;
    border: 1px solid #ccc;
    border: 1px solid rgba(0,0,0,.2);
    *border-right-width: 2px;
    *border-bottom-width: 2px;
    -webkit-border-radius: 6px;
    -moz-border-radius: 6px;
    border-radius: 6px;
    -webkit-box-shadow: 0 5px 10px rgba(0,0,0,.2);
    -moz-box-shadow: 0 5px 10px rgba(0,0,0,.2);
    box-shadow: 0 5px 10px rgba(0,0,0,.2);
    -webkit-background-clip: padding-box;
    -moz-background-clip: padding;
    background-clip: padding-box;
}

.tt-suggestion {
    display: block;
    padding: 3px 20px;
}

.tt-suggestion.tt-is-under-cursor {
    color: #fff;
    background-color: #0081c2;
    background-image: -moz-linear-gradient(top, #0088cc, #0077b3);
    background-image: -webkit-gradient(linear, 0 0, 0 100%, from(#0088cc), to(#0077b3));
    background-image: -webkit-linear-gradient(top, #0088cc, #0077b3);
    background-image: -o-linear-gradient(top, #0088cc, #0077b3);
    background-image: linear-gradient(to bottom, #0088cc, #0077b3);
    background-repeat: repeat-x;
    filter: progid:DXImageTransform.Microsoft.gradient(startColorstr='#ff0088cc', endColorstr='#ff0077b3', GradientType=0)
}

.tt-suggestion.tt-is-under-cursor a {
    color: #fff;
}

.tt-suggestion p {
    margin: 0;
}

.twitter-typeahead {
    width: 100%;
}

Language Switch

Heute stelle ich eine Lösung für einen Language switch im Zend2 Framework mit Ajax und Cookies.

Zu allererst muss die module.config.php Datei angepasst werden. In der Sekeletton Application von Zend2 ist der Translator bereits Konfiguriert und im Service Manager eingebunden. Ich habe lediglich die Übersetzungsdatei auf ein php – Array umgestellt:

(type => phparray und pattern => %s.php)


    'service_manager' => array(
        'factories' => array(
            'translator' => 'Zend\I18n\Translator\TranslatorServiceFactory',
        ),
    ),
    'translator' => array(
        'locale' => 'de_DE',
        'translation_file_patterns' => array(
            array(
                'type'     => 'phparray',
                'base_dir' => __DIR__ . '/../language',
                'pattern'  => '%s.php',
            ),
        ),
    ),

Außerdem habe ich für die Cookies die Module Klasse modifiziert:


class Module
{
    public function onBootstrap(MvcEvent $e)
    {
        $e->getApplication()->getServiceManager()->get('translator');

        $translator = $e->getApplication()->getServiceManager()->get('translator');
        if(isset($e->getRequest()->getCookie()->language) && $e->getRequest()->getCookie()->language != '' && $e->getRequest()->getCookie()->language != null){
            $language = $e->getRequest()->getCookie()->language;
            $translator->setLocale($language)->setFallbackLocale('en_EN');
        }
     }
}

Hierbei wird der Translator geladen. Weiters wird in der onBoostrap – Methode der Request abgefangen und ausgelesen. Ich hole mir mithilfe von getCookie() die Cookies aus den Request. Warum hier konkret language geholt wird werden wir anschließend im Controller sehen. Wenn die Sprache gesetzt worden ist wird sie dem Translator übergeben bzw. die Locale gesetzt. Also jene Variable die die Sprache bestimmt. Als Fallback wird hier z.B. Englisch angenommen.

Weiters benötigen wir für die Lösung einen Controller der uns den Cookie setzt. ich habe ihn hier in einen ApiController von mir geladen der Json für den Ajax Call als Antwort zurückliefert.


class LanguageApiController extends AbstractActionController
{

   public function indexAction(){
      $language = htmlspecialchars($this->getRequest()->getQuery('language', 'de_DE'));
      $cookie = new SetCookie('language', $language);
      $this->getResponse()->setStatusCode(Response::STATUS_CODE_201);
      $this->getResponse()->getHeaders()->addHeader($cookie);
      return new JsonModel(array('cookiecreated'=>'ok', 'language'=>$language));
   }
}

Hier wird, wie wir später noch sehen werden, einfach die Sprache mit einen GET Parameter gesetzt. Es wird ein Cookie erstellt der ‚language‘ auf den ausgelesen Wert speichert. Anschließend wird er der Response übergeben und dem Header des Requests hinzugefügt. Zum Schluss benötigen wir noch das notwendige JavaScript um die Sprache umzustellen.


$(document).ready(function(){

    $(document).on('click','a[data-action|=languagechanger]',function(event){
        event.preventDefault();

        $.ajax({
            url: baseUrl + '/languagesetter',
            data: 'language='+$(this).attr('data-value')
        }).always(function(){
           location.reload();
        });
    })

});

Mit dieser einfachen Methode wird nun der Controller aufgerufen und der Cookie gesetzt. Anschließend wird die Seite neu geladen und wir haben die Sprache im Cookie gespeichert. Wir können nun einfach in der View die translate Methode des Viewhelpers aufrufen.


## übersetzungsfile
return array(
    'Search'=>'Suche', 
....);

## in der view
echo $this->translate('Search')

Ankeränderungen

Des öfteren kommt es vor das man anhand des Ankers auch in JavaScript bestimmte Aktionen setzen will, vor allem um z.B. Permalinks zu bieten oder Suchergebnisse, anhand des Links weiter geben zu können.

Nach kurzer Suche bin ich über folgenden Eintrag in Stackoverflow gestoßen http://stackoverflow.com/questions/2161906/handle-url-anchor-change-event-in-js


if ("onhashchange" in window) { // event supported?
    window.onhashchange = function () {
        hashChanged(window.location.hash);
    }
}
else { // event not supported:
    var storedHash = window.location.hash;
    window.setInterval(function () {
        if (window.location.hash != storedHash) {
            storedHash = window.location.hash;
            hashChanged(storedHash);
        }
    }, 100);
}

Da in den neueren Browsern das event bereits unterstützt wird, kann hier auf die übliche Art eine Callbackfunction gelegt werden, für ältere Browser geht der Umweg über eine Variable als Sicherung und der Prüfung auf Zeit ob sich der Hash geändert hat.

Zusätzlich zu den Änderungen will man auch oft den Hashwert nach Seitenaufbau (z.B. $(document).ready(function(){…}); ) wissen, hierzu kann einfach nach Seitenaufbau wieder das window Objekt hergenommen werden


 if(window.location.hash != null && window.location.hash != undefined && window.location.hash != ""){
        hashChanged(window.location.hash);
 }